Hemmed In, LLC :: Home of The 3-In-1 Carseat Canopy
  • Home
  • SHOP
  • About
    • Our Story
    • Reviews
    • VIPCLUB
    • FAQ's
  • Giving Back
  • Blog
  • Contact
    • Product Review Program

Simple Dinner :: Spinach Burgers

2/14/2017

1 Comment

 
Picture
Another week, another quick & easy meal coming to you, from my tried & true kitchen testers (aka my family, friends and guests who've all agreed: this one's a keeper)

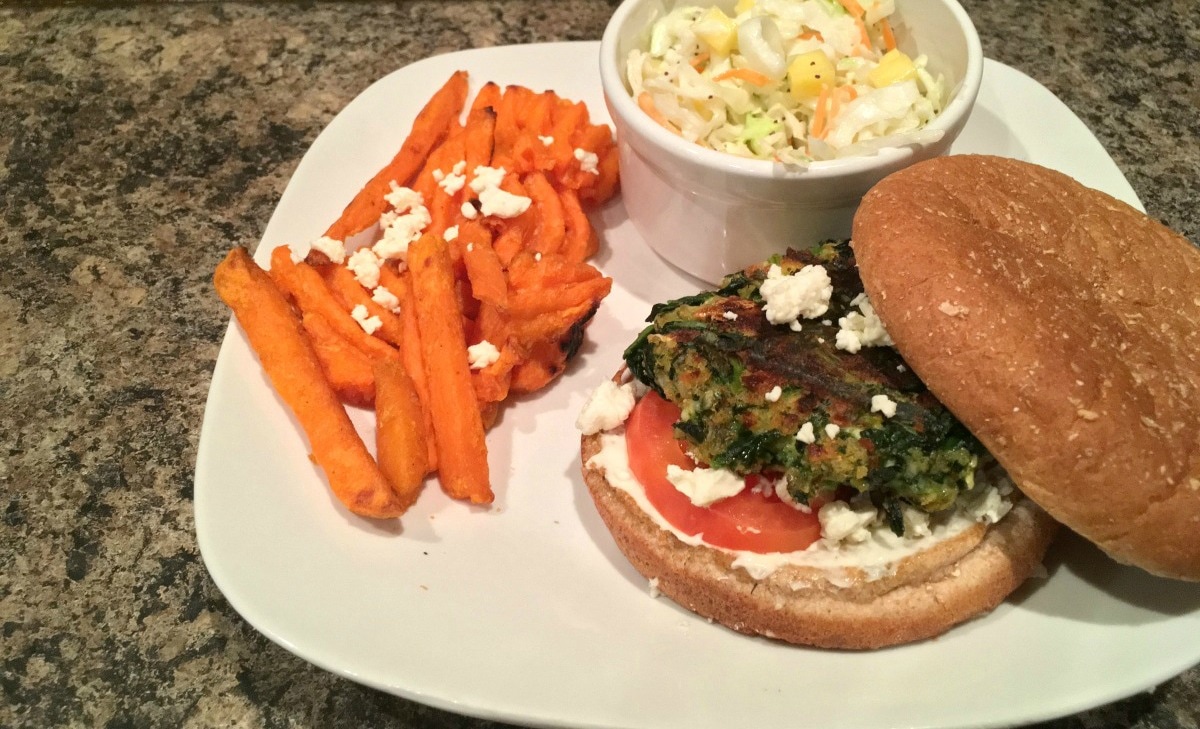
It's got a slight Greek flair to it, so I usually pair it with a quick salad and Sweet Potatoes, easily made while the burgers sit on the (Foreman) grill. 

This is another great one to freeze too, so I always make a double or triple batch to keep a few servings on hand in the freezer for a really quick dinner.

Ingredients

  • 1/4 cup Olive Oil
  • 1 teaspoon Oregano
  • 1 teaspoon Dill Weed
  • 1 Clove Garlic, minced
  • 1 cup Herb-Seasoned Stuffing Mix
  • 2 Eggs, beaten
  • 2oz Feta Cheese
  • 10oz Frozen Chopped Spinach, thawed and drained
  • 4 Hamburger Buns

Preparation

  1. In a medium bowl, combine oil, garlic, oregano, dill weed and 1/4 teaspoon pepper. Stir in stuffing mix to coat thoroughly. Stir in eggs, spinach and 1/2 cup Feta cheese; Mix well. Shape mixture into 4 half-inch thick patties.
  2. Heat griddle or large skillet over medium heat (we use a George Foreman grill). Add patties as they fit. Cook for 3-4 minutes per side or until browned and heated through. Serve in buns with toppings: feta, plain Greek yogurt, tomatoes, Tatziki Sauce, sliced roasted Red Peppers, Red Onion, etc.
Enjoy! Even my littlest one love these, hopefully yours will too.
1 Comment

Simple Dinner :: Easy Enchiladas

2/10/2017

1 Comment

 
Picture
The dinner time rush. The bewitching hour. The time when Moms around the country are juggling fussy babies, late afternoon grogginess and the inevitable "what's for dinner?" on repeat.

I'm here to help get dinner on the table quickly, healthily and simply with a few of my own tried & true crowd pleasers this month. Up first: filling, flavorful, freezable Enchiladas made with less than 10 ingredients and on the table in 45 minutes.

Ingredients

  • 2 Cups Cooked chicken: cubed, strips or shredded
               (I usually slow cook a whole chicken in some broth, then shred it and freeze it for multiple recipes)
  • 1 tub Cream Cheese 
  • 1 Can diced Green Chiles
  • 1 can Black Beans
  • 10 oz Bag of frozen corn, or fajita veggies; whatever's on hand :)
  • Shredded Cheddar Cheese
  • 15 oz Green Chile sauce or Green Enchilada Sauce
  • 1 dozen Tortillas
TOPPINGS: shredded lettuce, chopped tomatoes, sour cream (or plain Greek yogurt as substitute), avocados 

Preparation

  1. Preheat oven to 350*F.
  2. Place cream cheese, beans, chiles and chicken in skillet, letting the cream cheese melt and mix all together thoroughly. Stir in frozen vegetables.
  3. Spread half the can of Enchilada sauce on the bottom of a 13x9" baking pan. Spoon 1/3 cup filling in a tortilla, roll in the enchilada sauce and place seam down. Repeat with all tortillas and filling. Spread remaining Enchilada sauce over enchiladas and sprinkle shredded cheese on top. 
​*If preparing this for the freezer:* Cover tightly with aluminum foil at this step and place in freezer for up to one month. To use later, let dish thaw for 2 hours, then place in 350* oven for 30-45 minutes or until the tortillas are golden brown and the cheese is bubbling.
  • Bake at 350* for 25-30 minutes or until cheese is bubbling and tortillas are beginning to brown. Enjoy with whatever toppings your family prefers! (Side salad, rice or corn on the cob are all quick & easy dishes to pair with these for a more robust meal)
1 Comment

...KIDS' KITCHEN... National Lemonade Day Popsicles!!

6/4/2014

0 Comments

 
Picture
Nothing says "summertime" like basking in the sun with an ice cold lemonade and drifting off with the clouds in dreamy thoughts..... And with National Lemonade Day being this weekend, June 7th, what better Kids' Kitchen recipe to share than a simple, but delicious, Lemonade popsicle?! (because nothing says "childhood" like drippy, sticky popsicles on a sunny day, right?!)

Get your little budding entrepreneurs busy in the kitchen for about 30 minutes and they'll have the best Lemonade Stand in the city! (Add an adorable Apron as a fitting uniform, and they'll sell out before you can yell "Popsicles For Sale"!!)

With 2 simple ingredients, and an inexpensive popsicle mold, you can be pleased knowing that their new favorite summer dessert won't break the bank, consume copious amounts of time, or be full of junk. But warning--they go quickly! Maybe you should get a couple popsicle molds to stock the freezer up...


Read More
0 Comments

...Kids' Kitchen... Our Secret To Amazing Cookies

4/28/2014

0 Comments

 
Picture
Mmmmmm, soft, gooey, chocolatey cookies fresh from the oven. It brings back some sweet memories, does it not?! (Ok, so that's not quite a Nestle-commercial-quality picture, but I promise, the taste is right up there with any of the best of 'em!)

Little Lady requested that we make our neighbors cookies on her "Nani Decides Day" a couple weeks ago, and when I said we should make our "Secret" Chocolate chip Recipe, she quickly rebuked: "Keeping secrets isn't kind, Mama. You should tell 'em!"

Touche, Little Lady, touche. And while every kid I know loves to make cookies (and more importantly, test the dough), I thought I'd take her well-worded advice and share our "secrets" to a delicious batch of cookies with you & your little Sous Chefs :)

Honestly, like the good ol' "Friends" episode of cookie baking, we really just make some substitutions to Nestle's Chocolate Chip Cookie recipe found right on the chocolate chip package. So, here's our version, with perfect results every time!

"Secret" Chocolate Chip Cookies

Ingredients:

  • 2 1/2 Cups Whole Wheat (or White Whole Wheat) Flour
  • 1 tsp. Baking Soda
  • 1 tsp. Salt
  • 2/3 Cup Coconut Oil (no need to soften, using it in solid form is fine)
  • 3/4 Cup Turbinado Sugar (Sugar In The Raw)
  • 3/4 Cup Brown Sugar
  • 2 tsp. Pure Vanilla Extract
  • 2 Large Eggs (if dough is too dry, add another one!)
  • 2 Cups Chocolate Chunks** (they're sooo much better than chocolate chips, I promise!!)

Steps:

  1. Preheat oven to 375*F.
  2. Beat Coconut Oil, Brown Sugar, Raw Sugar and Vanilla Extract together in mixing bowl until smooth. Add eggs, one at a time, until creamy.
  3. In a separate bowl, combine Flour, Baking Soda and Salt. Gradually add to the wet ingredients, mixing well after each addition. Lastly, mix in the Chocolate Chunks.
  4. Spoon rounded dough balls onto ungreased cookie sheets, and bake for *8* minutes (no more, no less!)
  • KIDS JOBS: All the pouring, egg-breaking, and spooning of dough is all them! With the help of a full-coverage apron, they can get as into it as they like :)
Picture
Picture
Picture
They stay soft for days, and the extra chocolatey-chunk-ness is addicting-beware! 
TIP: roll dough into balls and freeze in a bag for later. Just throw in the oven at 375* fully frozen, bake for 9 minutes and serve fresh-out-of-the-oven cookies for last minute guests :)
0 Comments

...Kids Kitchen... Baked Cinnamon & Sugar Chips with Fruit Salsa

3/25/2014

0 Comments

 
PictureRecipe Credit: "Simply Colorado"; 1989
Spring has arrived, and that means summer is right around the corner! I really have a love/hate feeling towards Spring because it can be such a tease-especially here in Colorado. We can be in tank tops having a picnic on the porch one day and under 2 feet of snow the next. Quite literally. I wish I was exaggerating. *Sigh.* 
Buuut, I'm a sucker for sun and warmth, so at the first sign of it last week we started making cool summer food like we were going to a pool party. 

Summertime to me means lots and lots of colorful, juicy, in-season fruit. And the perfect pairing with that luscious fruit is a big 'ol bag of Cinnamon & Sugar Pita Chips! Just between you & me, I could eat a whole bag of Stacy's Pita Chips in a day. Eeek. Hopefully these will tame that a bit-they're just as crunchy & sweet. But way cheaper. And, I'm hoping, at least a bit healthier.

My little Lady loved this "activity" the whole way through. Loved every step of the recipe and she loved the tasty end result. Enjoy!

MATERIALS

  • ​1 Children's Apron
  • Basting Brush (or spray bottle)
Picture

Fruit Salsa

1. KIDS JOB: Finely chop all fruit and mix together in large bowl. 
2. KIDS JOB: Using a potato masher, "smash" fruit till juice starts flowing. 

INGREDIENTS

  • 20 (4" square each) Wonton Skins (found in produce section, near mushrooms usually)
  • Water
  • 1 tsp. Cinnamon
  • 1/4 Cup Sugar (we used Turbinado sugar)
  • Variety of Fruit, finely chopped (Strawberries, Kiwis, Mangos, Raspberries, Blueberries...whatever sounds good!)
  1. Preheat oven to 350*. Cut wonton skins in halves by making 1 diagonal cut thru the center. (or for smaller chips, make 2 diagonal cuts, making each square into quarters.)
  2. KIDS JOB: Arrange wonton skins in a single layer on ungreased cookie sheets; spray or brush lightly with water (try to go easy with the water, too much makes them stick when baked and the sugar go all gooey)
  3. KIDS JOB: Combine cinnamon & sugar; sprinkle evenly over wet wonton skins.
  4. Bake for 5 minutes or until lightly brown. Let cool on baking sheet then remove. 
  5. Serve with fresh fruit salsa & store in airtight container (if you have any left!)

Read More
0 Comments

...Kids Kitchen... Fall Baking! Pumpkin "Donut Holes"

9/14/2013

2 Comments

 
Picture
Recipe Source: The Craving Chronicles
Picture
Fall came to Colorado in a heck of a hurry this week. Last Saturday we were hitting up the Birthday party circuit in 90 degree summer weather; Monday we were wearing sweaters, trapped inside due to a massive hail & rain storm...a storm that continued for the past 5 days and flooded a good part of the state...
So, I am officially calling it Fall. Add to it that Starbucks is already making millions of Pumpkin Spice Lattes and it's really official. Fall is here.
And what is more quintessential fall than baking? Baking with Pumpkin! (Thank you Starbucks, for glorifying the big, bright fruit (vegetable?!) to unusual heights.)


Hold on to your hats, folks, because these little suckers are GOOD. You probably already know that I have an infatuation with donuts. Well these little "donut holes" are just as mouth-watering and addictingly good as their circular cousin. (Not true donut holes, these are made in mini muffin tins so they're a bit obsure-shaped but who cares.) They're bite size and melt in your mouth. You should definitely make these when you're having company. A lot of company. Because the recipe makes a ton and you're gonna want to eat every.single.one. 


This recipe is also great to whip up with the help of your Little Sous Chef, just make sure they're properly covered because it can get messy with the bag-shaking fun they'll undoubtedly want to be in charge of. 


Here's what you need:

MATERIALS::

1 Children's Apron
Mini-Muffin Tin
1 Plastic Ziplock Bag (1 Gallon size)
Picture

INGREDIENTS::

1 3/4 Cup Flour
2 tsp. Baking Powder
1/2 tsp. Salt
1/2 tsp. Cinnamon
1/2 tsp. Nutmeg
1/2 tsp. Allspice
1/8 tsp. Ground Cloves
1/3 Cup Canola Oil (we used Applesauce)
1/2 Cup Brown Sugar
1 Egg
1 tsp. Vanilla Extract
3/4 C Canned Plain Pumpkin (we used frozen pumpkin puree from garden pumpkins)
1/2 Cup Milk (we used Almond Milk)

For Coating:
1 stick Margarine, melted
2/3 Cup Granulated Sugar
2 Tbsp. Cinnamon
1. Preheat oven to 350 degrees. Coat each cup in a 24-cup mini muffin tin with baking spray or grease generously.
2. KIDS Job: In a medium bowl, whisk together flour, baking powder, salt and spices. In a separate bowl, whisk together oil, brown sugar, egg, vanilla, pumpkin and milk until smooth. Add dry ingredients to wet ingredients and mix until just combined.
3. Spoon 1 tablespoon of batter into each muffin cup. Bake at 350 degrees for 10  minutes or until a toothpick comes out clean.
4. While the donut holes bake, melt margarine in one bowl and combine granulated sugar and cinnamon in a large Ziplock-style bag. Remove donuts from oven and cool for 2 minutes, or until just cool enough to handle. Dip each cooled donut hole in melted margarine, then pop into the bag of cinnamon & sugar.
KIDS JOB: Close the bag tight and shake it until donut holes are well coated.
Repeat steps with remaining batter. 
Makes approximately 4 dozen donut holes.
Picture
Picture
Picture
Happy Fall, everyone! 
To all my fellow Coloradoans, I hope you (& your homes) stay safe & dry this weekend.
2 Comments

...Kids Kitchen... Baked Doughnuts

4/17/2013

0 Comments

 
Picture

Ok, so being a donut fanatic myself, I'm going to have to keep the frequency of this little activity in check...But here's a really easy, really fun recipe kids can help with from start to finish. Luckily our Bible study gals were here to help us devour these in 1 night, but they do keep decently as leftovers!

MATERIALS::

1 Children's Apron
1 Doughnut Pan (available on Amazon & in specialty kitchen stores)
Various Toppings (i.e.-nuts, sprinkles, coconut, etc)
Picture

INGREDIENTS::

Vanilla Cake Donut:
2 C Flour (we used 1 1/4 C white flour, 3/4 C wheat flour)
1/2 C Brown Sugar         
2 tsp Baking Powder      
1/4 t Nutmeg                  
 1 tsp Salt                      
3/4 C Buttermilk (we used Coconut milk, it was just fine)
2 Eggs, lightly beaten    
1 1/2 tsp Vanilla
2T butter, melted (we used applesauce, again, it was fine)
*Makes 12 doughnuts


Chocolate Cake Doughnuts:
1 C Flour                       1/4 C Cocoa Powder
1/2 tsp Baking Soda        1/4 tsp Salt
1/2 C Buttermilk             1/2 C Brown Sugar
1 Egg                           4 tsp Melted Butter
1 tsp Vanilla
*Makes 6 Doughnuts

1. Heat oven to 425*F and spray donut pan with nonstick cooking spray.
2. In large bowl mix dry ingredients. Add buttermilk, egg(s) and butter. Beat until just combined. Fill each donut cup approximately 2/3 full.
3. Bake 7-9 minutes, or until the top of the donuts spring back when touched. Let cool in the pan for 4-5 mins before removing.
4. Top & Decorate as desired! (see below for topping recipes)

Cinnamon Sugar

Mix 2 Tablespoons Sugar with 1 Tablespoon Cinnamon. Melt 1 Tablespoon Butter.
Dip the donut in melted butter and roll in cinnamon/sugar mixture to coat.

Chocolate Glaze

Microwave 1/2 C Semisweet Chocolate Chips with 2 Tablespoons Butter and 2 Tablespoons Corn Syrup in a bowl for 1 minute (or in a double boiler, stirring frequently) until melted. Stir in 1 Tablespoon Water until the glaze is thick and smooth. Use immediately to glaze donuts.

Powdered Sugar

Put 2/3 C Confectioners Sugar in a ziplock bag. Add a warm donut, close the bag, and shake until the donut is coated.

Here's what our donut-making fun looked like:

Picture
**Did you know that Baking-not frying-these homemade delights saves you a whopping 12g of fat compared to store-bought (& store-fried) donuts? YEOW! That's what I call 'healthfood'! ;)
**If you fill the pan with too much dough, then you'll get a bit of a muffin-top effect. --->
Of course, if you eat too many, you'll get the same effect, but that's another story...
Picture
Picture
Picture
**To Freeze Donuts for later topping & enjoying: Wrap tightly in plastic wrap & foil (if you have foil, unlike me at this present time) and freeze for up to 1 month. Thaw, frost or cover as desired, & Enjoy!
0 Comments

    RSS Feed

    Picture

    Author

    Wendy, owner & designer of Hemmed In, shares inspiration for living simply, bits and pieces of running a small business, and a sneak peek into the journey of domestic adoption.


    Picture
    Picture
    Picture

    Categories

    All
    Adoption
    Hemmed In News
    Kids Kitchen
    Quick DIY's
    Simplify


Powered by Create your own unique website with customizable templates.
  • Home
  • SHOP
  • About
    • Our Story
    • Reviews
    • VIPCLUB
    • FAQ's
  • Giving Back
  • Blog
  • Contact
    • Product Review Program